Is your garden hose leaking or damaged? Don’t worry! We often need help with this problem. You can typically fix your water hose or garden hose in various ways. That’s what we are going to talk about in this article.
Leaks, drips, clogs, and other issues can disrupt water flow. These issues also hinder the effectiveness of a hose. Eventually, it leads to frustration and wasted time. But if you know how to fix them, it typically saves re-purchase costs.
Following our step-by-step directions, you can confidently take on any challenge. You can eventually get your water hoses working as well as before. So, let’s get started.
How to Fix a Water Hose: Fixing a Leaking Problem
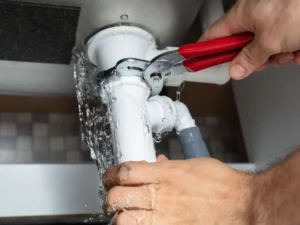
Before fixing a water hose, it’s essential to understand the problem entirely. Safety is another crucial step that you must follow. Wear gloves to protect your hands from sharp edges. In addition, ensure that the water source is turned off.
Fixing a water hose is simple and quick. Basic DIY skills and following instructions are enough for most repairs. In this section, we will learn the step-by-step process of a general leaking problem. However, the other types of issues may have different fixing solutions.
Material Preparation
For this process, you will need some tools and materials. Tools may include a Philips-head screwdriver, pliers, and utility knife. These tools will help you take apart and reassemble hose parts during the repair process.
Next, gather the required materials for the repair job. Different materials may be needed for various types of leaking problems. Check out the following table.
| Materials | Leaking Position |
| Rubber washers | Leaking at the hose end |
| Clench hose menders | Leaking in the male or female connector foot |
| Hose Clamps | Leaking at the middle of the hose |
| Clamp Couplers | Leaking at the middle of the hose |
| Compression Mender | Leaking at the middle of the hose |
Identify the Position of the Leak

First, locate the leak in your water hose. This can help you choose the suitable repair material. Then, carefully inspect the entire length of the hose. Check for any signs of damage or moisture indicating a leak. Once you know the type of leak, you can determine the most appropriate repair method.
Measure The Hose
Next, measure the diameter of the hose to determine the correct size of the repair material. This will ensure you have the proper size and amount of repair materials. Three typical inner diameter (ID) sizes are 1/2, 5/8, and 3/4 inches. Note that the outer diameter (OD) usually is 1/8 times the inner diameter (ID).
You can use a tape measure to check the outer diameter of the pipe. Although your measurement may still not be accurate, you can guess the size of your pipe.
Repair The Hose Based on Different Leaking Positions
Do the first two steps to find where the leak is coming from. There are several ways to find the leak. You can look for signs of water or damage or run your hand along the hose to feel wet spots. Please choose the right way to fix the leak from the list below based on its location.
Position #1 Leaking at the Hose End
It’s easy to fix if you see that water is leaking from any end of the hose. This problem typically happens due to misaligned or damaged rubber washers. Replacing the rubber washer can fix the issue.
Fixing method: Remove the water hose from the outdoor faucet. Then, if the hose has any attachments, remove them, too. Find the rubber washers now. If you don’t see them, put the new rubber washers inside the hose ends.
Position #2 Leaking in the Male or Female Connector foot
If you see that the leak is at the base of either the male or female connection, you may need to replace it. A typical hose connector may have a coupling, clamp, and sometimes tangs for tightening. One of the popular connectors is “clench hose menders.” We will use it in this fixing method.
Fixing Method: First, remove the hose from the outdoor faucet. Then, cut the leaked portion off the hose. You can use a utility knife to do that. Next, insert the narrow section of the connector inside the hose. For clench hose menders, bend the tangs for tightening. Other connectors may have different tightening mechanisms. While tightening, do not apply too much pressure. If you do so, it may puncture the hose.
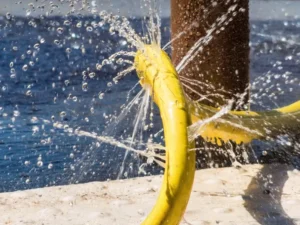
Position #3 Leaking at The Middle of The Hose
If you locate the leak at the middle hose, you can fix it in three ways, each using different materials.
Fixing Method 1: You can use a clamp coupler for this method. However, you can use a utility knife to cut the damaged portion of the hose. Then, unscrew the coupler with a screwdriver. Now, you can insert the coupler barbed into the hose. Finally, change the cover of the coupler and screw it back using a screwdriver.
Fixing Method 2: Experts recommend this way for repairing leaks in the middle of the hose. You will need two hose clamps and one copper tube for this method. However, begin the process by cutting the damaged portion off the hose. After cutting the hose, put a hose clamp over the end of it. Then, insert the appropriate-size copper tube into the water hose. Now, use a screwdriver to tighten the hose clamp. Do the same for the other part of the water hose.
Fixing Method 3: You can also use a compression mender to fix a leak in the middle of the hose. This method is like the other two above but uses another type of material.
Other Water Hose Problems
Other than leaking problems, your water hose may encounter various issues. The following five issues are the most common. Check out these issues to learn more about how to fix them.
Situation #1 Damaged Hose End
A damaged hose end occurs when the tip of the hose is cracked, broken, or otherwise compromised. Eventually, this leads to leaks and inefficiencies in water flow.
Solution: Fixing a damaged hose end is simple. Trim the affected part of the hose. Then, attach new water hose fittings. A standard hose repair kit makes these steps easy to manage.
Situation #2 Dripping Problem
The issue of dripping, often caused by damaged rubber washers, can be effectively resolved by replacing them. This is the most dependable and efficient solution for addressing this problem.
Solution: Remove the hose from the outdoor faucet. In addition, remove the attachment from the hose ends. Check for the rubber washers. If you can’t find it, put the new rubber washer and reassemble all the parts.
Situation #3 Hole/Cut in The Hose
When a hole or cut occurs in the hose, it typically leads to leakage and inefficiency, which eventually hampers its functionality. This common issue often arises due to wear and tear, accidental damage, and exposure to sharp edges.
Solution: Remove the hose from the outdoor faucet. Cut the damaged portion off the garden hose. For the leaking problem, use hose clamps, clamp couplers, or compression menders.
Situation #4 Clogs
Are you experiencing low water flow and pressure, or even no water at all? Then, it’s definitely a clogging problem.
Solution: To solve this problem, you need to identify the position of the clog. You can see from one end to the other using a plumber’s snake. You can also run water through the hose to remove the blockage.
Situation #5 Kinks & Crimps
This is one of the most frustrating problems with your water hose. The main reason for this problem is the cheap quality of the material. Another cause might be improper storage after use.
Solution: When you buy a water hose, always consider its quality. Also, try to store it correctly. Use an appropriate storage strategy for long-lasting performance, such as a garden hose reel. However, if you already see the kinks, you can straighten the hose when flushing the water and massage the area where the kinks are. If this doesn’t solve the issue, you can follow the fixing method for leaking problems.
Frequently Asked Questions
How much does it cost to repair a water hose?
It usually costs little to fix a water hose. Materials like hose clamps or repair kits range from $5 to $10. On the other hand, necessary tools, such as screwdrivers or pliers, may add up to $20. Overall, the total expense of repairing a garden hose remains relatively affordable.
Can you patch a hose with tape?
Yes, you can patch up minor holes or leaks in your hose with tape. However, consider using electrical, duct, or dedicated hose repair tape. Before patching, always ensure the water hose is completely clean and dry. As you wrap the tape around the hose, overlap it gradually.
What type of hose is used for water?
Water hoses are made of rubber, vinyl, or reinforced PVC. They are great for high-pressure uses and can withstand various environmental conditions. Therefore, they are often used in gardening and irrigation.
Summary
In this article, we have covered how to fix common water hose problems. To repair leaks, identify the leak’s position. This will give you an idea of what repair material you should purchase.
You can avoid these issues by picking up good-quality water pipes. Think about the material, how long it will last, and how flexible it is. Choose tubes that are made of good rubber or PVC that have been reinforced. Look for features like UV protection and kink resistance.
In addition, opt for hoses with reputable brands and positive customer reviews. All these considerations will give complete reliability. For more information, feel free to contact our customer support team. We have a team of professionals who are always happy to assist you.