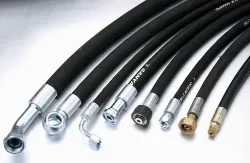
Hydraulic hoses are an integral part of many machinery and equipment. It plays a crucial role in transmitting hydraulic fluid that empowers the movement of heavy-duty machinery. With this purpose, hydraulic hoses power everything from construction to industrial machinery. Over time, these hydraulic hoses degrade or accidentally face leaking problems. Therefore, replacing a hydraulic hose on time is crucial for your system’s reliable performance.
Timely replacement of hydraulic hoses is paramount to a system’s efficient and safe operation. Neglecting their upkeep can lead to a cascade of issues. A hydraulic machine may face a variety of hydraulic failures. It may range from leaks to catastrophic failures that endanger personnel and hydraulic equipment.
The purpose of this article is to guide you through the essential steps of replacing a hydraulic hose. It ensures you have the knowledge and expertise to keep your machinery running smoothly and securely. However, we’ll delve into the meticulous process of safely removing hydraulic hoses. In addition, we will learn the significance of selecting suitable replacements. Moreover, we will know more about when you should perform hydraulic line replacement.
Whether you are a technician or a machinery operator, this comprehensive guide will help you. It enables you to enhance your understanding of the hydraulic system with skills to safeguard your equipment. Above all, the “How To Replace Hydraulic Hose” guide ensures you run durable and efficient hydraulic machines.
How to Replace Hydraulic Lines
Replacing a hydraulic hose is not difficult if we know the right trick for installing and removing hydraulic hoses. We have divided this section into three primary categories. Firstly, the “How to Remove Hydraulic Hose” section highlights the proper way of removing hydraulic lines. The “How to fix a hydraulic hose” section highlights the appropriate installation process. The final section teaches us how to determine whether a hose requires replacement.

1. How to Remove Hydraulic Hose
Replacing a hydraulic hose requires precision and care. It starts with the crucial step of removing the old hose. With this purpose, this section will delve into the intricate details of removing a hydraulic hose. The step-by-step process ensures that we can proceed with confidence.
Safety Precautions
Before embarking on the task of replacing a hydraulic hose, prioritizing safety is paramount. The safety precaution begins with the proper use of safety gear. Hydraulic systems involve high-pressure fluids that can be hazardous if not handled carefully. Therefore, safety glasses, gloves, and protective clothing are not optional.
Safety glasses shield our eyes from splashes or debris. In addition, gloves protect our hands from hydraulic fluids and sharp edges. On the other hand, protective clothing adds an extra layer of defense.
Release Pressure
The next step that we must ensure is to release hydraulic pressure. Depending on our hydraulic system, this can involve various procedures. It may include opening relief valves, activating control levers, or following system-specific guidelines. The goal is to ensure no residual pressure in the hydraulic lines. Note that it prevents any unexpected hydraulic fluid discharge during hose removal.
Therefore, we should take time and carefully follow the prescribed steps to release pressure. This way, we can ensure our safety and the integrity of the hydraulic system.
Using A Bucket Underneath The Hose
We will prepare for the next step once we’ve safely depressurized the hydraulic system. We use a suitable container, like a bucket underneath the hose intended to be removed. This container will catch any hydraulic fluid that may escape during the hose removal.
Note that hydraulic fluid can be messy and potentially hazardous. Therefore, having a container ready to collect spills is a crucial precaution.
Removing Additional Components
Before proceeding to the next step of removing hydraulic hoses, it is essential to address any additional components. These components might obstruct the removal process. We begin by identifying and locating coverings or hose clamps. These components usually secure or conceal the hose. In this case, we use appropriate tools, such as screwdrivers or pliers, to detach these components carefully.
We can get free access to the hydraulic hose by eliminating these obstacles. It facilitates hose safety and efficient removal. This step prevents potential complications during the hydraulic hose replacement process.
Cleaning The Fittings on Both Sides
Cleanliness is crucial when working with hydraulic systems. Before disconnecting the old hose, thoroughly clean the fittings on both ends. This step prevents contamination and ensures a secure connection when installing the new hose. We use lint-free cloths and appropriate cleaning agents to remove dirt, debris, or residuals from the fittings.
Unscrewing The Hydraulic Fitting Using Two Wrenches
After following the safety measures and cleaning the fittings, we can remove the old hydraulic hose. The process typically requires two wrenches. In this case, we use the first one to hold the fittings in place and the other to unscrew the fittings from the hose. We can also follow the manufacturer’s instructions for the specific hose and fittings we are working with.
2. Installing The New Hose
Replacing a hydraulic hose is not just about removing the old one. Correctly installing the new hose is also crucial to ensure a hydraulic system’s integrity and safety. Therefore, this section aims to provide step-by-step guidelines on “How To Change A Hydraulic Hose.”
Choosing The Appropriate Hydraulic Hose For Replacement
Selecting the proper hydraulic hose is essential for a successful replacement. Consulting the equipment’s manual or specifications helps identify the required hose. In this case, we check the hose size, pressure rating, temperature range, and compatibility with hydraulic fluids. In addition, we consider factors such as the type of hydraulic system and the specific application.
Once we have these details, we can confidently choose the appropriate hydraulic hose that meets the requirements.
Covering The Hose With Abrasion Sleeves To Avoid Rubs
Abrasion sleeves typically prevent premature wear and tear. It enhances the durability of the new hydraulic hose. In addition, it protects the hose from rubbing against abrasive surfaces or sharp edges during the installation. However, we slide the abrasion sleeve over the hose and cover areas vulnerable to potential abrasion. This additional layer of protection will extend the life of the hydraulic hose in demanding situations.
Clean And Prepare The Hose
Before installation, properly cleaning and preparing the new hydraulic hose is crucial. Any contamination or debris left on the hose could lead to system contamination or component damage. Firstly, we inspect the hose for any dirt or foreign particles. In this case, we can use lint-free cloths and appropriate cleaning agents for the hose’s exterior.
Later, we pay attention to the hose ends and fittings. Here, we ensure that they are free from any contaminants. After cleaning, we allow the hose to dry thoroughly before installing.
Install The Hydraulic Hose Using Wrenches
Properly attaching the new hydraulic hose ensures a leak-free hydraulic system. Firstly, we position the hose with the appropriate fittings at both ends. In this case, we use two wrenches to install the new hydraulic hose. We use the first one to hold the fitting in place and the other to tighten the fitting onto the hose. We ensure that we securely fastened the hose to the fittings.
We can also follow the manufacturer’s torque specifications to ensure a tight and reliable connection. We should be cautious not to overtight as it may damage the hose or fittings. Double-check that the hose is correctly aligned and seated on the fittings to prevent any potential leaks.
Replace Other Components That You Removed Earlier
Previously, we removed hose coverings and hose clamps. Over time, these components also degrade and get damaged. Therefore, replacing them is crucial for maintaining the system’s efficiency. We ensure these components are securely fastened and correctly positioned. Proper alignment enables them to support and protect the new hydraulic hose.
Test The System
After installing the hydraulic hose, it’s time to test the system to ensure it functions appropriately without leaks. We carefully pressurize the system, following the manufacturer’s guidelines. In this case, we must use the appropriate equipment. Now, we observe the newly installed hydraulic hoses for any signs of leaks. If we detect any leaks, we promptly address and rectify the issue. Thoroughly securing these components will help maintain the hose’s integrity. It also saves it from potential damage.
3. Determine Whether A Hose Requires Replacement
We can take several crucial steps to identify whether a hydraulic hose requires replacement. These steps include regular maintenance, visual inspection, operational issues, and use time. We may observe several issues that determine immediate hose replacement during these steps. These issues include cracks, cuts, swelling, leakage, softening, hardening, and discolourization.
- Scheduled maintenance: Regular check-ups can help us identify the issues in the hydraulic system. We may observe leaks or unusual problems during cleaning or checking the parts. In this way, we can know whether a hydraulic hose requires replacement.
- Visual inspection is a valuable method for identifying whether a hose requires replacement. We must replace the hose immediately during the inspection if we observe any of the abovementioned issues.
- Operational issues: We may observe unusual pressure readings while working with a system. If we face this situation, we must do a visual inspection to identify the problem. We can also consult professionals to learn more about the issues and their appropriate solutions.
- Age and usage: The hose manufacturer typically determines the hose’s durability. If it exceeds the limit, replacing the hydraulic hose is compulsory.
Conclusion
In the above discussion, we hope we have covered all the crucial steps required for replacing a hydraulic hose. Each step is essential, from removing the old hose to successfully installing the new one. By following these steps, we can ensure a perfect hydraulic hose replacement. Note that an ideal replacement provides a reliable and effective hydraulic system.
Above all, if you face difficulties during the replacement process, please contact our customer service team. Rentone Hose keeps one of the best customer service teams in the hydraulic hose market. You can reach them all seven days a week and twenty-four hours a day.